TL;DR
- Team Rocket is a corrupt organisation in the Pokemon world.
- Adzooma’s Sophie Logan and Mark Neale went undercover to see what Team Rocket were doing with Google Ads.
- Sophie and Mark set up Discovery Carousel Ads, Shopping Ads, Expanding Text Ads (ETAs), and Responsive Search Ads (RSAs).
- Mark Neale’s whereabouts are unknown.
Paid ads are boring.
Yes, I said it. In 2018, Google’s ad revenue amounted to more than $116 billion (USD) but most of the time, the revenue is the fun part. Nobody gets excited about clicks, impressions, or pay-per-click (PPC).
But what if the ads were cool? So cool, you remembered them for being cool. And what if they were about one of the most dominant crazes of the past 20 years?
Enter the world of Pokémon and the most nefarious organisations in it – Team Rocket.
Team Rocket – a brief history

If you’ve heard of Pokémon, you’ll know Team Rocket. But for those who don’t, here’s a brief history.
Team Rocket is an organisation that pursues evil and the exploitation of Pokémon to make a profit. They do this by obtaining strong Pokémon and selling them to fund their “experimental research”.
Their objective is to take over the world using Pokémon. What a lovely group of people, eh?
Their plans were foiled by a trainer called Red and Team Rocket’s leader, Giovanni, disbanded the group, only to come back years later before disbanding again. And again years after that.
A word from Team Rocket boss, Giovanni

The problem with being the head of a corrupt capitalist organisation is it’s hard to change. Your reputation always precedes you. Giovanni was the head of Team Rocket a former Gym Leader but now he has other plans. For this article, I spoke to him on Skype about his new plans for Team Rocket and their involvement with Google Ads. This is what he had to say:
“It’s time for change. We can no longer operate in the way we used to. Now we move towards the future in the digital age, promoting Pokemon through paid advertising.”
When asked what he meant by “promoting Pokemon”, the connection cut out and he’s since been unavailable for comment. How convenient.
Introducing Sophie and Mark
Losing contact with Giovanni made the investigation difficult. My other Team Rocket leads went cold. Nobody wanted to talk.
That left me with no other option. I had to enlist the help of two PPC professionals to infiltrate Team Rocket and find out what was going on. But rather than expose them, they had to blend in and use Google Ads to “promote” Pokemon (whatever that meant).
My volunteers were Mark Neale, Head of Paid Media, and Sophie Logan, PPC Manager.
How to sell Pokémon on Google Ads – the Team Rocket way
We found 3 main ad formats that sold the most Pokemon:
- Discovery Carousel Ads
- Shopping Campaigns
- Search Campaigns
- Expanding Text Ads (ETAs)
- Responsive Search Ads (RSAs)
Discovery Carousel Ads
Discovery Carousel Ads allow advertisers to showcase one or more images of their product or service via a swipeable carousel of cards. This highly visual and engaging ad format benefits from text fields, ideal for showcasing the evolution stages of Pokemon for sale.
Here’s how to set up a Discovery Carousel Ads campaign:
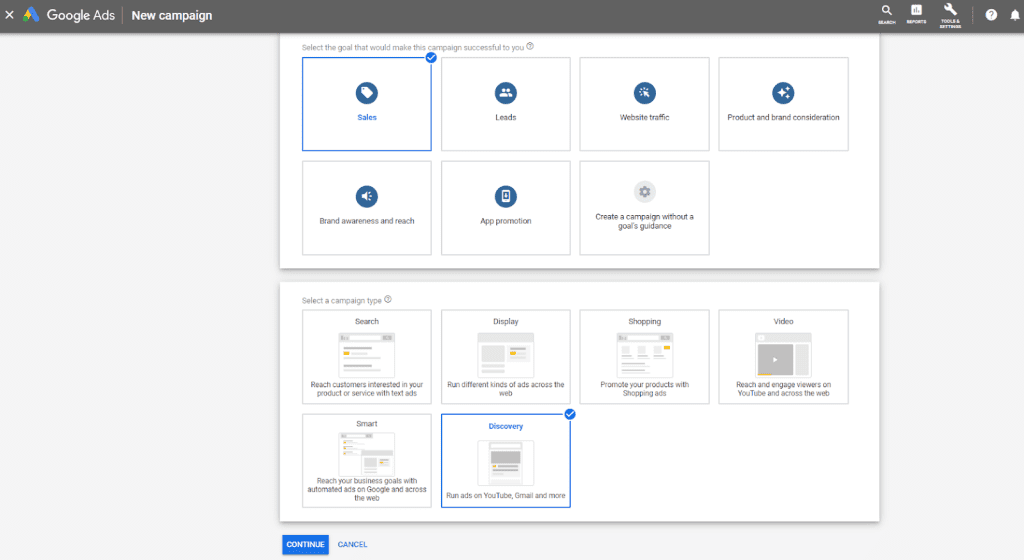
Step 1: Create a New Campaign – Click ‘New Campaign’ > Select ‘Sales’ > Select ‘Discovery’ > Click ‘Continue’
Step 2: Amend campaign settings
- Name your campaign.
- Select where you would like to show your ads. Not prepared to ship your Pokémon aboard? Then make sure you only target locations you are willing to deliver to.
- Select the language which you and your customers speak.
- Choose how you would like to bid for this campaign. If you would just like to sell as many Pokémon as possible then leave the setting as ‘Maximise Conversions’. However, if you have a maximum price you are willing to spend to reach a sale, then select ‘Set a target cost per action’ and enter your amount.
- Set an individual daily budget for your campaign or select an existing budget from your shared library.
- Create an ad group and name your ad group with your Pokémon’s name.
Step 3: Audience targeting – Click ‘Browse’ > Click ‘New Custom Intent Audience’
- Give your audience list a name.
- Add at least 50 different keywords associated to your target audience.
- Once you have finished, click ‘Create’
- You can further expand on this audience list by listing websites and apps which your target audience is likely to visit. For example Pokémon forums or information sites.
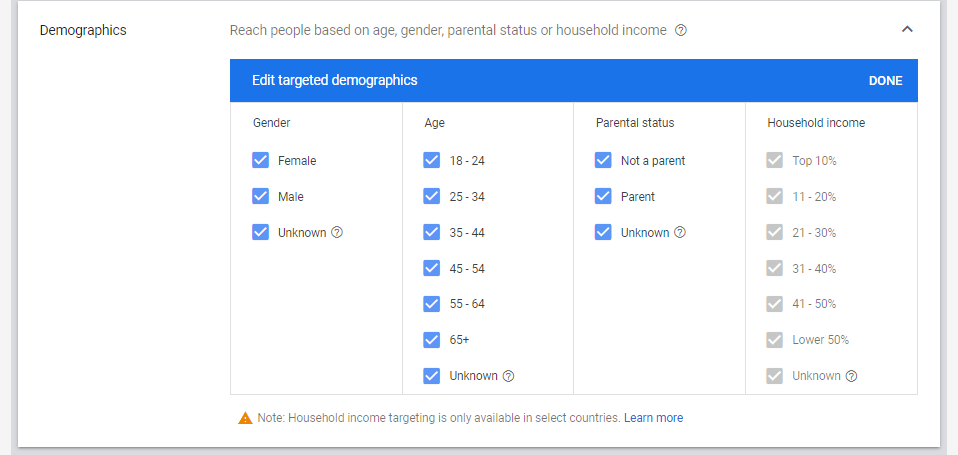
- Your next targeting option is demographics, which includes gender, age and parental status. Here you can choose to include or exclude specific demographics of your choosing. If you are unsure on the demographics of your target audience, then leave them all selected.
- Once completed, click ‘Done’ to ensure all of the targeting work you have done is saved!
Tip: When thinking of keywords, try to think like the customer. What keywords and terms would they use on Google relating to your Pokémon? Think about things like the Pokémon’s abilities, what they evolved into, and their base stats.
Sophie Logan – Undercover Team Rocket Grunt and PPC Manager
Step 4: Create your ads – Click ‘New Ad’ > Select ‘Discovery Carousel Ad’
- Complete the text fields.
- Click ‘Images and Logo’ – Select the ‘Upload’ tab – Click ‘Choose File to Upload’.
- For this first card, you want to upload an image of your Pokémon in its first stage and click ‘Save’.
- From the drop-down menu select ‘Use as Image’ and crop your image as necessary so you have both a square and landscape variation of your image.
- Complete the card forms including a headline, final URL and the most relevant call to action text, then click ‘Done’. You have now created your first card.
- Continue to make a new card for each stage of your Pokémon evolution.
- Once all of your cards are created, you need to add your business logo by clicking ‘Logo’ and following the same image upload process as above.
- Before saving, ensure you review your cards are in the correct order by using the preview tool. Once you are ready, click ‘Add to Ad Group’ and then ‘Create Campaign’.

Congratulations, your campaign is ready!
Shopping Campaign
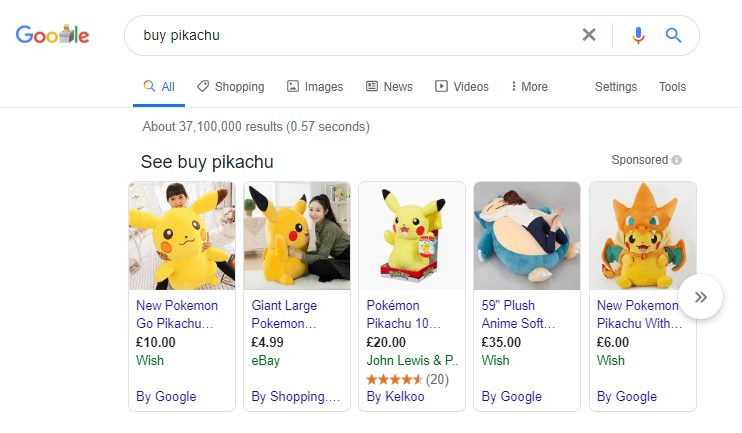
Shopping Campaigns allow users to easily search, view and compare products. They appear at the top of Search Results, positioning them above all Search Ads and Organic results. Their format also means that more information on your Pokémon can also be presented, unlike the character limitations on the Search and Display Networks.
Shopping Campaigns are ideal for listing a large number of Pokémon at once and utilising the product feature fields to describe base stats and classifications like Egg Groups.
Google Merchant Center
Before you can get your Shopping Campaign started, you must first create a Google Merchant Center account and link into your Google Ads account.
Your Google Merchant Center account is where you upload your Pokémon listing feeds, which will contain all of your Pokémon information and attributes. It is important to accurately and thoroughly describe your Pokémon using all relevant available fields, as this will ensure your ad has all the details Pokémon trainers need to make a purchase. Once your Merchant Center account is created, your Pokémon product feed is populated and you have linked the account with your Google Ads, you are ready to start creating your shopping campaign!
Step 1: Create a New Campaign. Click ‘New Campaign’ – Select ‘Sales’ – Select ‘Shopping’ – Click ‘Continue’
Step 2: Amend campaign settings
- Name your campaign
- Select the Merchant Center account you previously created. If it is not showing up then you may not have linked it correctly.
- Select what country you would like to sell your Pokémon in. Remember, if you’re not prepared to ship your Pokémon aboard then make sure you only target locations you are willing to deliver to.
- Choose how you would like to bid for this campaign. If you would just like to sell as many Pokémon as possible then leave the setting as ‘Maximise Conversions’. However, if you have a maximum price you are willing to spend to reach a sale, then select ‘Set a target cost per action’ and enter your amount.
- Set an individual daily budget for your campaign or select an existing budget from your shared library.
- Team Rocket have chosen to run a standard Product Shopping ad as they’re new to the Shopping Network, but you can choose to opt for a Showcase Shopping Ad. Once you’ve created and named your ad group, enter your bid for the ad-group and click save!
Make sure the photo of your Pokémon is high-quality!
Mark Neale – Undercover Team Rocket Grunt and Head of Paid Media
Tips on Shopping Campaign images
- Make sure the photo of your Pokémon is high-quality! Images should include your Pokémon only, with no watermarks or backgrounds. Buyers want to see the full body of your Pokémon, not just their face, so make sure you get a full-body shot. Remember, this will be the first time buyers see your Pokémon, so make sure you get the right photo which will make them fall in love instantly!
- Use Negative Keywords – Negative keywords stop your ads from showing in irrelevant search results, reducing wasted spend and fruitless website traffic. When creating a negative keyword list, think of words and phrases which are associated with, but not relevant enough, for your Pokémon sale. For example, terms relating to giving a Pokémon away for free, such as ‘Free’, ‘Donate’ or ‘Surrender’.
You can continuously expand on your negative keyword list by periodically reviewing your search term history and identifying anything irrelevant.
- Remember to keep your ads up to date. If you only have one Dragonite, which you then successfully sell, then make sure you end the relevant ads! Not only will you be wasting money by advertising for a Pokémon which is no longer available, but you will also disappoint browsers when they discover that it has already been sold.

Search Campaign
The two text ad formats we used for our search campaign were Expanding Text Ads (ETAs) and Responsive Search Ads (RSAs).
With ETAs and RSAs, users have a higher intent when using the Search Network as they are actively seeking a product or service themselves. This means they are more likely to convert and purchase your Pokémon.
They’re also ideal for reaching buyers who know exactly what Pokémon they are looking for and are ready to make a purchase.
Step 1: Create a New Campaign – Click ‘New Campaign’ > Select ‘Sales’ > Select ‘Search’ > Select ‘Website Visits’ and enter your web address > Click ‘Continue’
Step 2: Amend campaign settings
- Name your campaign.
- Select the Networks you want your ads to appear in. Team Rocket recommend the Search Network only for anyone still getting used to the Google Ads platform.
- Select where you would like to show your ads. Not prepared to ship your Pokémon aboard? Then make sure you only target locations you are willing to deliver to.
- Select the appropriate language.
- Set an individual daily budget for your campaign or select an existing budget from your shared library.
- Choose how you would like to bid for this campaign. The Search Network offers many different bidding strategies, but Team Rocket recommends using ‘Manual CPC’ to begin with. With CPC for such Pokémon as Starmie coming in at £7.22, you want to ensure that you are in control of how your budgets spent.
- Set an individual daily budget for your campaign or select an existing budget from your shared library.
- Click ‘Save and Continue’
Step 3: Create an Ad Group
- Name your ad group
- Enter keywords or phrases which you would like your ads to show for in search results. Remember: There are a variety of different match types you can use when selecting your ad groups keywords.
- Click ‘Save and Continue’
Step 4: Create your ads
Now it’s time to write your ads. Remember, this is likely to be the first impression a potential buyer has of you and your Pokémon listings, so make it count!
1. Write your first ad. Here are what each of the ad fields means and how we recommend using them:
- Final URL – The webpage you are sending searchers to; the Pokémons sale profile.
- Headline 1 – The Product or Service, so in this case, your Pokémons name.
- Headline 2 – A feature or offer which will differentiate you from competitors.
- Headline 3 – Your business’s name.
- Display path – A vanity URL for your landing page.
- Description 1 – Describe what you have for sale and include a call to action to encourage engagement with your ad.
- Description 2 – Explain the benefits/advantages of your product or service, which in this case is the charming characteristics of Snorlax.
2. Once you have finished writing your ad make sure you click save and continue. It would be a shame to lose all of your hard work!
3. It is recommended that you have at least 3 different ad variations in a single ad group, so continue to write ad variations using the same format as above. This is a perfect opportunity to test different ad copy, headlines and keywords to see what works best with your audience, so get creative.
Tips
- Responsive Search Ads – Once you are comfortable with Text Ads you should give Responsive Search Ads a go! This ad format utilises machine learning to generate the most effective combination of headlines and descriptions based on searchers’ behaviour.
- Use Negative Keywords! Negative keywords stop your ads from showing in irrelevant search results, reducing wasted spend and fruitless website traffic. When creating a negative keyword list, think of words and phrases which are associated with, but not relevant enough, for your Pokémon sale. For example, terms relating to giving a Pokémon away for free, such as ‘Free’, ‘Donate’ or ‘Surrender’.
You can continuously expand on your negative keyword list by periodically reviewing your search term history and identifying anything irrelevant.
You can expand the size of your ad by utilising the various ad extensions available on the Search Network including Site Link Extensions, Call Extensions and Structured Snippets. The benefit of ad extensions is that they will not only increase the size of your ad for no additional cost, but you can use them to further expand on the product information in your text ad. They also facilitate signposting searchers to other relevant pages on your site, such as similar Pokémon for sale.
What Mark & Sophie learnt about Team Rocket and Google Ads
I managed to speak to Sophie after the campaigns went live and asked her how she felt infiltrating the most corrupt organisations in the (Pokemon) world.
I was nervous! Team Rocket has quite the reputation and I wasn’t sure how I was going to keep up.
Sophie also said she was amazed by how big the Pokémon world was and how complex all the Pokemon’s names were. By understanding the evolutions, she said, she realised their importance but it took some time to get her head around.
Would she do it again?
“I think that Team Rocket has got a big job on their hands if they want to keep selling Pokémon via Google Ads. They might need to invest in another team member to manage their campaigns, in which case, I’d be open for consideration!”
Mark Neale was unavailable for comment, presumed in the captivity of Team Rocket. We’ll let you know if we find him.